Creating a Virtual Drive Using Advanced Configuration
|
1. |
Perform either of the following steps to bring up the Configuration wizard: |
|
|
Right-click the controller node in the device tree in the left frame of the MegaRAID Storage Manager window, and select Create Virtual Drive. |
|
|
Select the controller node, and select Go To > Controller > Create Virtual Drive in the menu bar. |
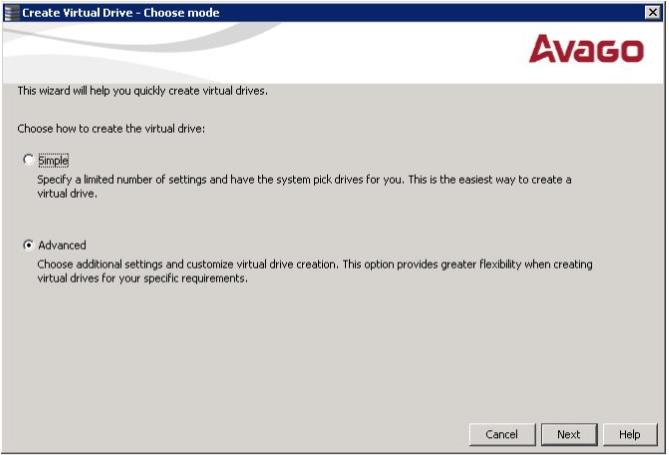
Figure 52. Create Virtual Drive - Choose mode Dialog
|
2. |
Select the Advanced radio button, and click Next. |
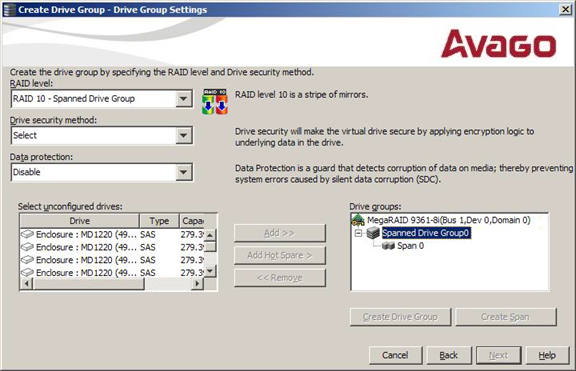
The Create Drive Group Settings window appears, as shown in the following figure.
Figure 53. Create Drive Group - Drive Group Settings Window
|
3. |
Select the following items on the Create Drive Group - Drive Group Settings window: |
|
a. |
Select the RAID level desired for the drive group from the drop-down menu. To make a spanned drive, select RAID 10, RAID 50, or RAID 60 in the RAID level field. |
Drive Group 0 and Span 0 appear in the Drive groups field when you select RAID 10, 50, or 60.
|
b. |
Scroll down the menu for the Drive security method field if you want to set a drive security method. |
The drive security feature provides the ability to encrypt data and use disk-based key management for your data security solution. This solution provides protection to the data in the event of theft or loss of drives. See Avago MegaRAID SafeStore Encryption Services, for more information about drive security and encryption.
|
c. |
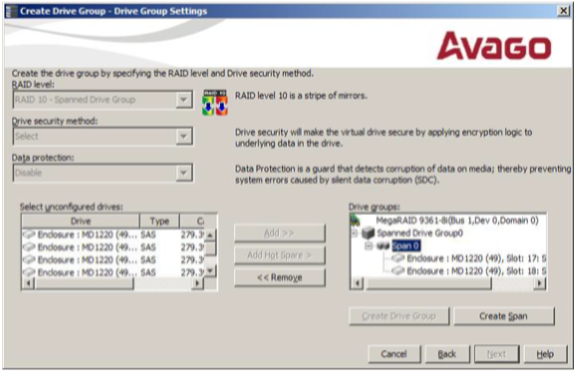
Select unconfigured drives from the list of drives, and click Add> to add them to the drive group. |
The selected drives appear under Span 0 below Drive Group 0, as shown in the following figure.
Figure 54. Span 0 of Drive Group 0
|
d. |
Click Create Span to create a second span in the drive group. |
|
e. |
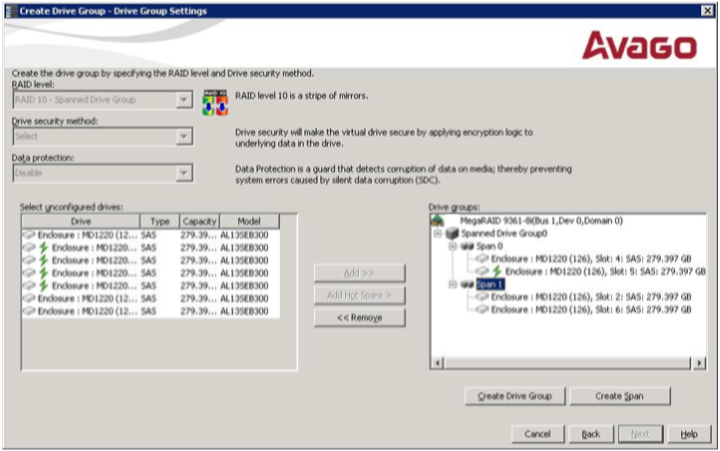
Select unconfigured drives from the list of drives, and click Add> to add them to the second drive group. |
The selected drives appear under Span 1 below Drive Group 0, as shown in the following figure.
Figure 55. Span 0 and Span 1 of Drive Group 0
|
f. |
Click Create Drive Group to make a drive group with the spans. |
|
g. |
Click Next to complete this step. |
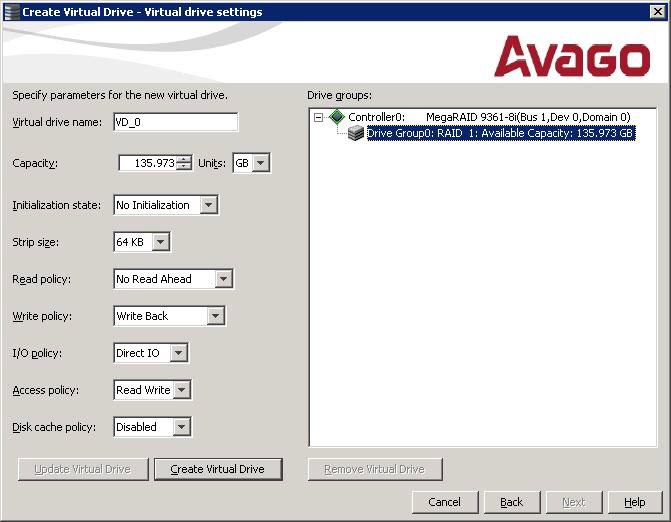
The Create Virtual Drive - Virtual drive settings window appears, as shown in the following figure. The drive group and the default virtual drive settings appear. The options to update the virtual drive or remove the virtual drive are grayed out until you create the virtual drive.
NOTE The parameters in the Create Virtual Drive - Virtual drive settings window display in Disabled mode (grayed out) for SAS-Integrated RAID (IR) controllers because these parameters do not apply to SAS-IR controllers.
Figure 56. Create Virtual Drive - Virtual Drive Settings Window
NOTE If you select Write Back as the write policy, and no battery exists, the battery is low or failed, or the battery is running through a re-learn cycle, the write policy switches to Write Through. This setting eliminates the risk of data loss in case of a power failure. A message window notifies you of this change.
NOTE If the controller supports High Availability DAS, the Provide Shared Access option appears in the above dialog. Select this option if you want the virtual drive to be shared between the two servers in a cluster.
See Selecting Virtual Drive Settings, for more information about the virtual drive settings.
|
5. |
Click Create Virtual Drive. |
The new virtual drive appears under the drive group. The options Update Virtual Drive and Remove Virtual Drive are available. Update Virtual Drive allows you to change the virtual drive settings, and Remove Virtual Drive allows you to delete the virtual drive.
|
6. |
Click Next. |
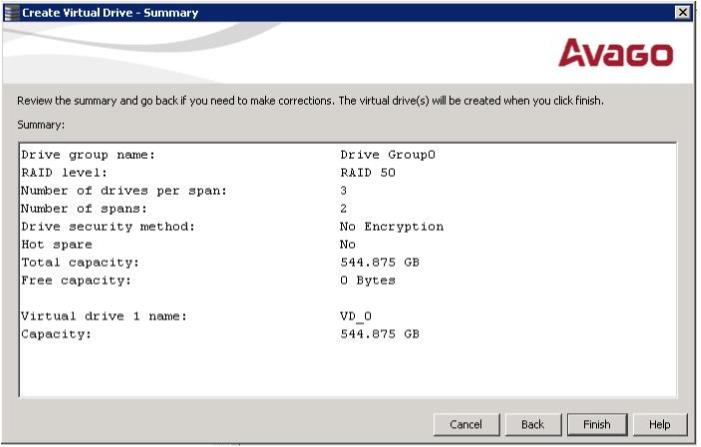
The Create Virtual Drive - Summary window appears, as shown in the following figure. This window shows the selections you made for advanced configuration.
Figure 57. Create Virtual Drive - Summary Window
|
7. |
Click Back to return to the previous window to change any selections, or click Finish to accept and complete the configuration. |
After you click Finish, the new storage configuration is created and initialized according to the selected options.
|
8. |
Click OK. |
The Enable SSD Caching on New Virtual Drives dialog appears.
The newly created virtual drive is enabled for SSD caching by default.
|
9. |
Click OK to confirm SSD caching on the virtual drive. Click No if you want to disable SSD caching on the virtual drive. |
The All check box is selected by default. To disable SSD caching on the virtual drives, deselect the All check box.
|
10. |
Select either Yes or No to indicate whether you want to create additional virtual drives. |
If you select Yes, the system takes you to the Figure 4. If you select No, the utility asks whether you want to close the wizard.
|
11. |
If you selected No in the previous step, select either Yes or No to indicate whether you want to close the wizard. |
If you select Yes, the Configuration wizard closes. If you select No, the dialog closes, and you remain on the same page.
