When the MegaRAID Storage Manager software is running, you can see the status of all virtual drives. If a virtual drive is operating normally, the icon looks like this: ![]() . Color-coded circles appear next to the icon to indicate the following:
. Color-coded circles appear next to the icon to indicate the following:
When the Logical tab is selected, the panel on the left shows which drives are used by each virtual drive. The same drive can be used by multiple virtual drives.
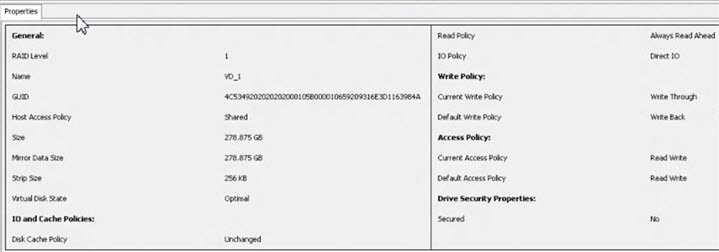
To display complete virtual drive information, click the Logical tab in the left panel, and click on a virtual drive icon in the left panel. The properties appear in the right panel as shown in the following figure. The RAID level, strip size, and access policy of the virtual drive are set when the virtual drive is configured.
Figure 90. Virtual Drive Properties
If High Availability DAS is supported on the controller, two additional virtual drive properties, GUID and Host Access Policy appear on the Properties page.
|
|
GUID - Indicates a unique ID assigned to this virtual drive by the firmware. |
|
|
Host Access Policy - Indicates whether or not the virtual drive is shared between the servers in a cluster. The values for this property are Shared, Exclusive, and Exclusive to Peer Controller. |
You can change the read policy, write policy, and other virtual drive properties. To change these properties, see Changing Virtual Drive Properties.
NOTE You can change the Read Policy, Write Policy, and other virtual drive properties by selecting the virtual drive icon and then selecting Go To > Virtual Drive > Set Virtual Drive Properties in the menu bar.
|
2. |
Either select Go To > Virtual Drive > Start Locating Virtual Drive, or right-click a virtual drive and select Start Locating Virtual Drive from the menu. |
The LEDs on the drives in the virtual drive start blinking (except for the hot spare drives).
|
3. |
To stop the LEDs from blinking, select Go To > Virtual Drive > Stop Locating Virtual Drive, or right-click a virtual drive and select Stop Locating Virtual Drive from the menu. |
