Using the MegaRAID CacheCade Pro 2.0 Software
The MegaRAID CacheCade Pro 2.0 software provides you with read and write caching capability.
Perform the following steps to use the CacheCade Pro 2.0 software:
|
|
Right-click on a controller in the device tree in the left frame of the MegaRAID Storage Manager window and select Create CacheCade SSD Caching. |
|
|
Select a controller and select Go To > Controller > Create CacheCade SSD Caching in the menu bar. |
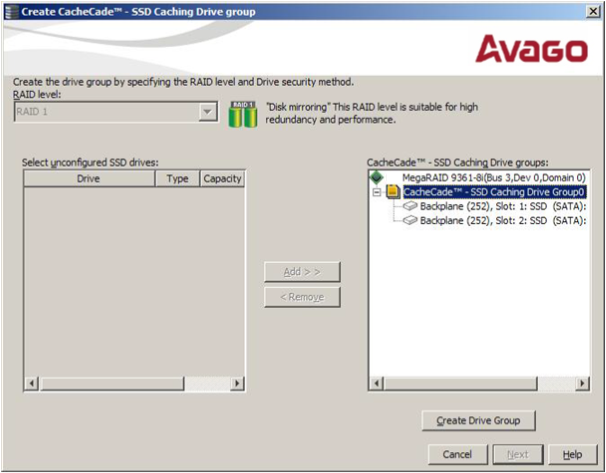
The CacheCade SSD Caching wizard appears, as shown in the following figure.
Figure 122. CacheCade SSD Caching Wizard - First Screen
|
2. |
Select a RAID level for the CacheCade virtual drive in the RAID level field. |
|
3. |
Select an unconfigured SSD drive, for the selected RAID level, from Select unconfigured SSD Drives in the left frame. |
After you select an unconfigured SSD Drive, the Add button is enabled.
|
4. |
Click Add to add the selected drive to the CacheCade - SSD Caching Drive groups in the right frame. |
After you click Add, the Create Drive Group button is enabled.
|
5. |
Click Create Drive Group. |
The newly created drive group appears in CacheCade SSD Caching Drive groups in the right frame.
|
6. |
Click Next. |
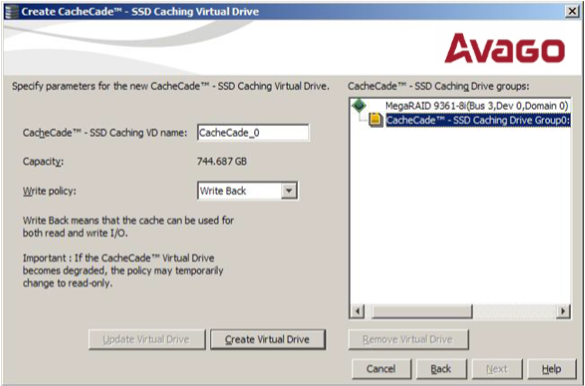
The next wizard screen appears.
Figure 123. Parameters for CacheCade SSD Caching Virtual Drive
|
7. |
Enter a name for the CacheCade virtual drive in the CacheCade - SSD Caching VD name field. |
|
8. |
Select a write policy from the Write policy drop-down list. |
A description of the selected write policy appears below.
|
9. |
Click Create Virtual Drive. |
The newly created virtual drive appears in the CacheCade SSD Caching Drive groups in the right frame. The Remove Virtual Drive button is enabled. You can select the newly created virtual drive and click Remove Virtual Drive to delete the virtual drive.
|
10. |
Click Next. |
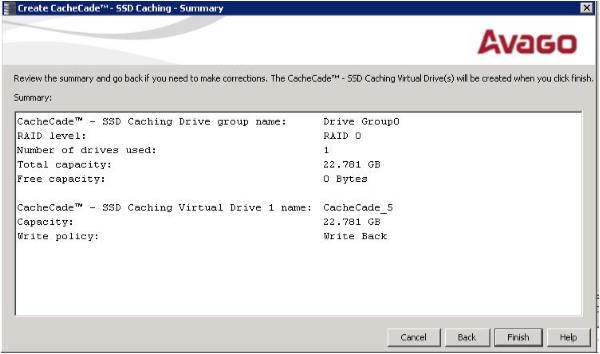
Figure 124. Create CacheCade - SSD Caching - Summary
|
11. |
Click Finish. |
A confirmation message displays after the CacheCade virtual drive is successfully created. The CacheCade drive icon appears next to the RAID controller in the left frame in the MegaRAID Storage Manager window.


